วันอาทิตย์ที่ 8 กันยายน พ.ศ. 2556

Delicious cases for iPhone ซูชิไอโฟน


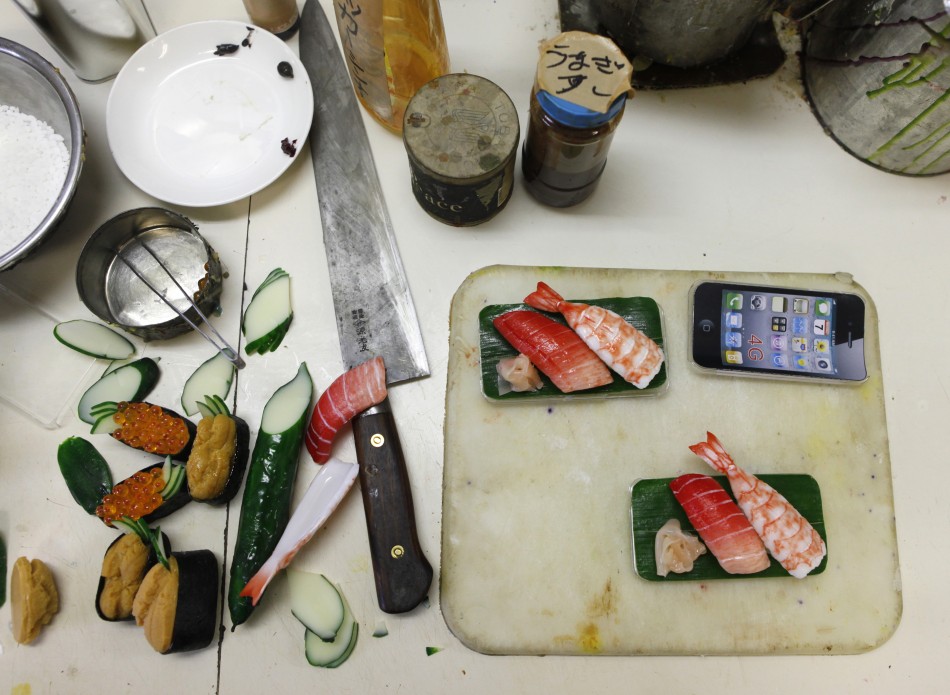
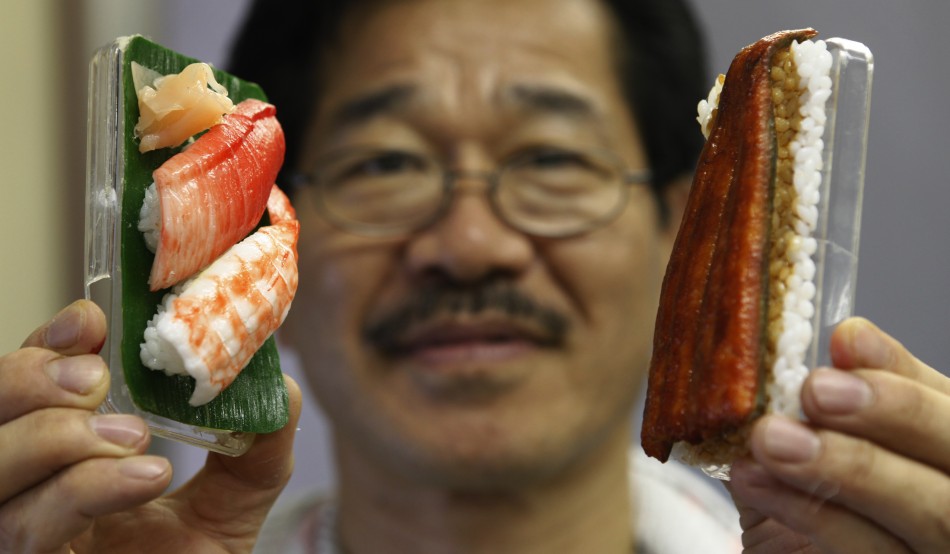
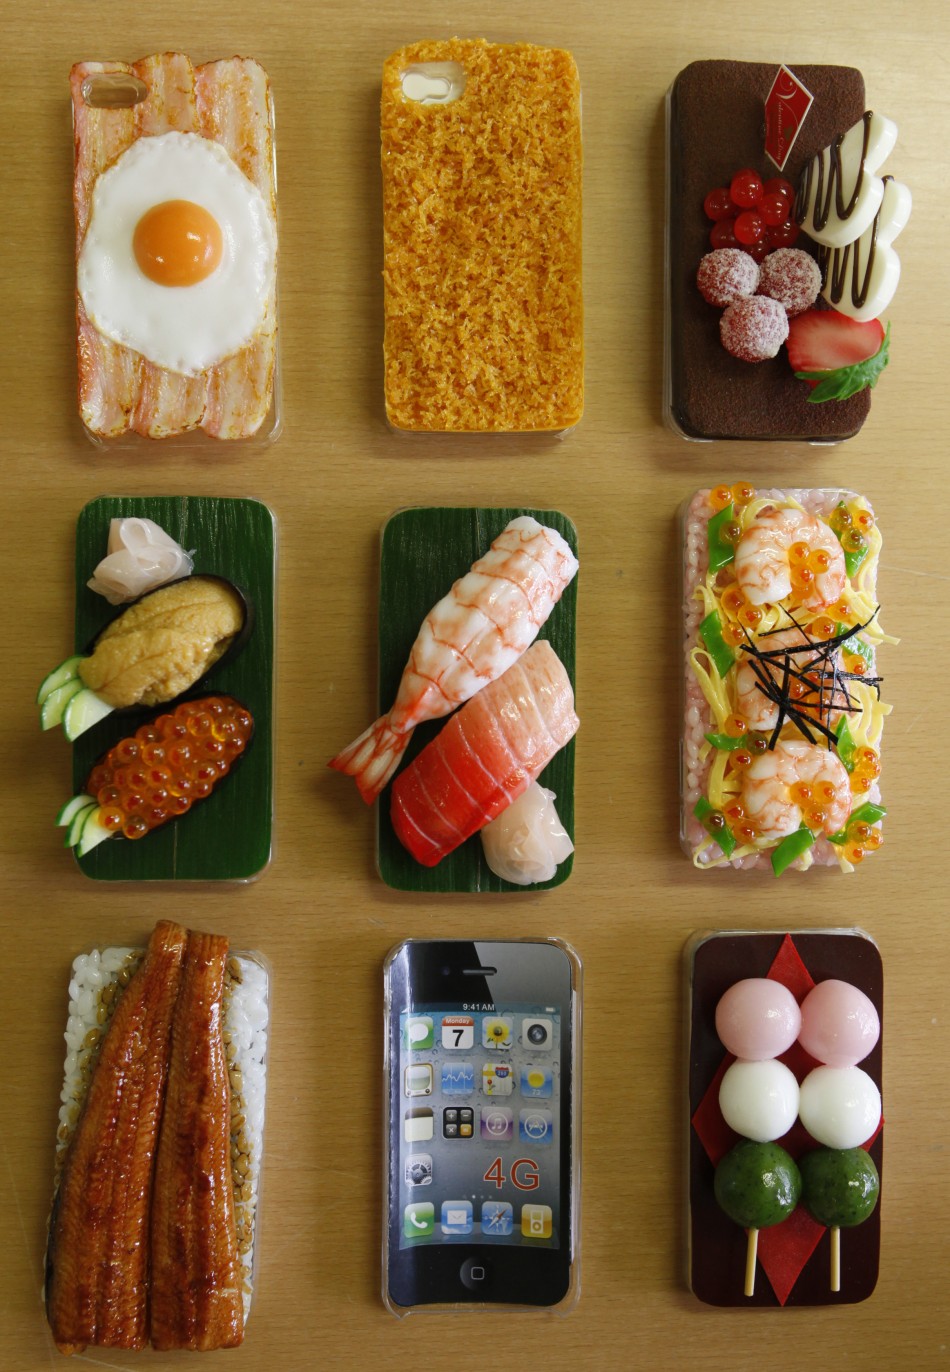
Tokyo-based company specializing in the manufacture of plastic food for display windows of restaurants, undertook to provide "iPhones" covers, decorated with dummies of different dishes. The menu is quite varied. Here there are so beloved by the Japanese sushi and grilled pork and fried egg, and even a chocolate cake.
บริษัทผู้เชี่ยวชาญด้านการผลิตอาหารพลาสติก ที่เอาไว้โชว์ตามหน้าต่างร้านอาหารต่างๆ ในนครโตเกียว ประเทศญี่ปุ่น  ได้เสนอรูปแบบแาหารพลาสติกเหล่านี้ 
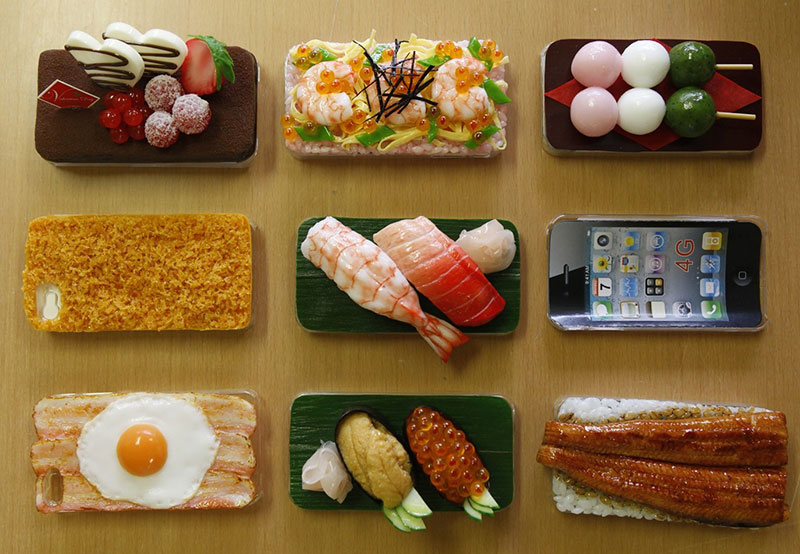
BIGPIC8 Delicious covers for IPhone


139728 decorate iphones with shushi photos Delicious cases for IPhone
1. Plastic food in Japan - the usual thing. In the ad showcases restaurants in every corner of Japan can be found models of dishes, from the familiar to the Japanese Yakisoba Italian spaghetti. "Boom" dummy food in Japan began with the 20-ies of the last century, and since then the Japanese have come up with more new and unusual ways to use it.
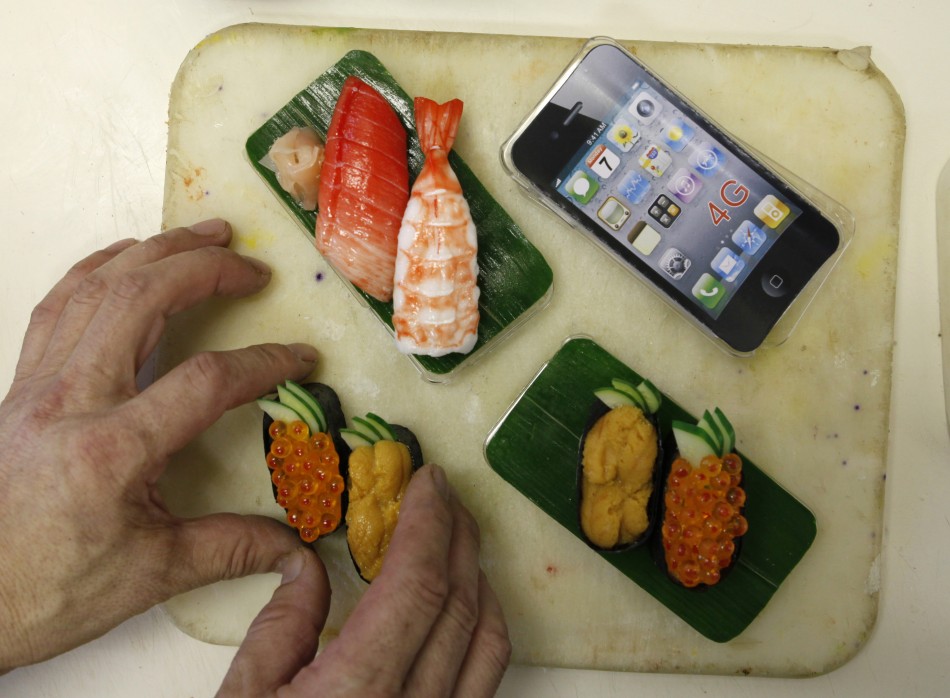
139729 decorate iphones with shushi photos Delicious cases for IPhone

2. At the end of last year, Tokyo-based Suetake Sample in Yokohama has found a rather trivial, the way to use plastic food: they decorated it covers for iPhones.

139730 decorate iphones with shushi photos Delicious cases for IPhone
3. First, the master received a few orders. However, the "telephone food" quickly sparked the appetite of owners of "iPhones".
139731 decorate iphones with shushi photos Delicious cases for IPhone
4. The company last year sold more than 6,000 "tasty" covers. 300 were shipped overseas.
139732 decorate iphones with shushi photos Delicious cases for IPhone
5. Each model is made dishes by hand, so the covers are not cheap. Price ranges from 25 to 50 U.S. dollars.
139733 decorate iphones with shushi photos Delicious cases for IPhone
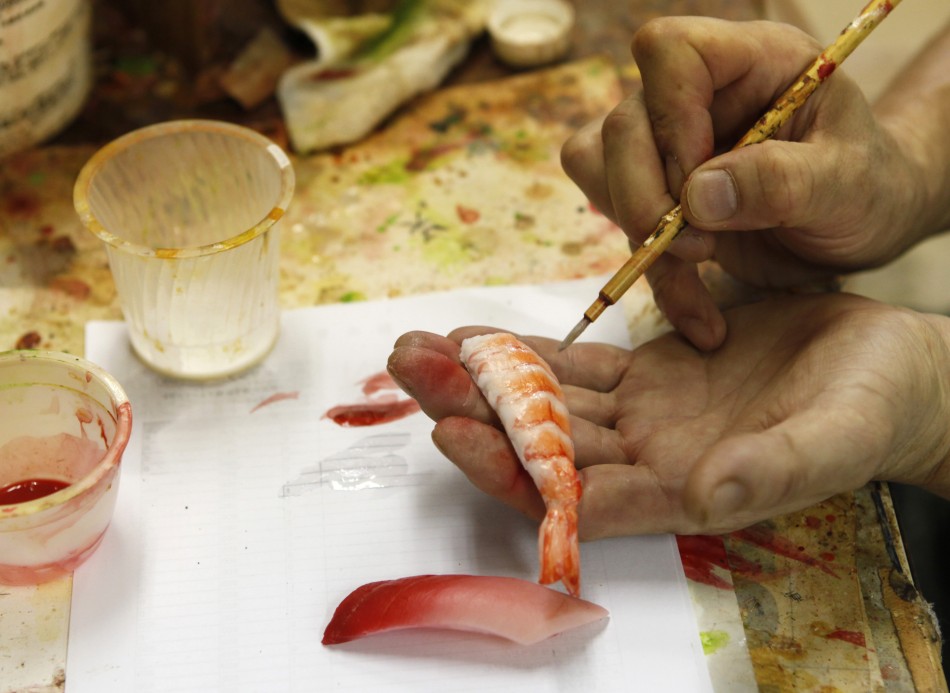
6. Master Noboru Kuvadayra, a specialist in the production of plastic food models in Japan, poses for a photographer with one of his works.
139734 decorate iphones with shushi photos Delicious cases for IPhone
7. Cover from the collection iMeshi looks unusual, but it is made so skillfully that I want to eat it immediately.
139735 decorate iphones with shushi photos Delicious cases for IPhone
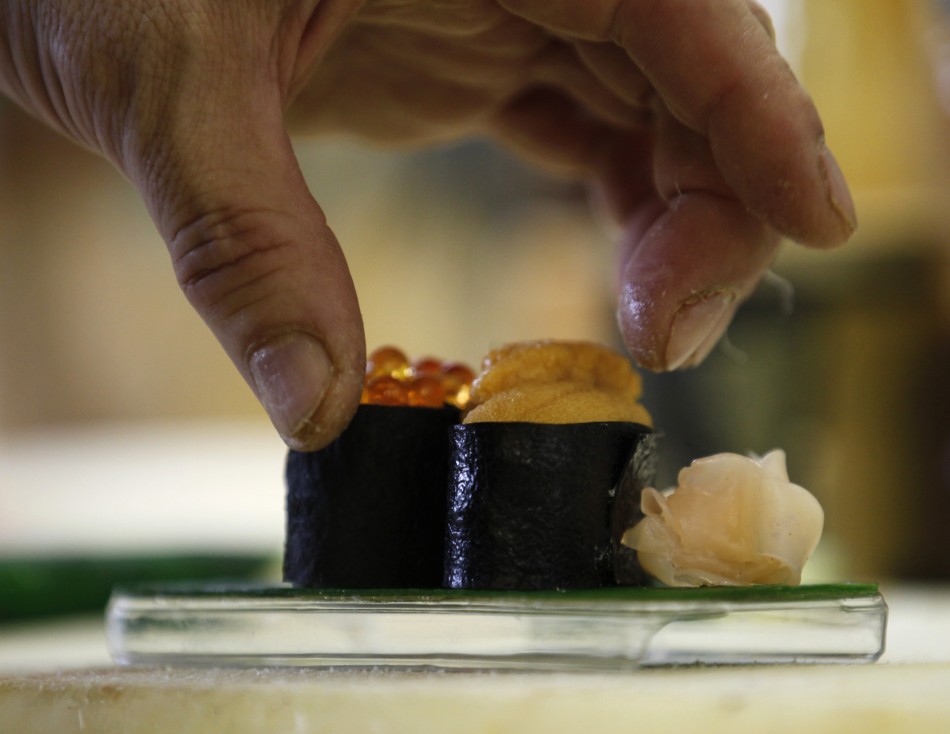
8. Specialists of the company had become virtuosos to put their delicacies in small canisters.

ขอขอบคุณ http://occupatech.blogspot.com

Internet Connection Problems ปัญหาการเชื่อมต่ออินเทอร์เน็ต


               by  Teacher  Phaitoon  Yaemprasuan   :   occupatech@gmail.com
                                                            http://picta55.blogspot.com


Sometimes the problems caused by unintentional human errors
บางทีนะ  ปัญหาก็เกิดจากความผิดพลาดที่ไม่เจตนาของคนเราเองนี่แหละ

Sometimes Internet connection problem can be our frustration. Rather than pressing F5-key and  trying to reload the website when we experience a problem, here are some ways we can troubleshoot the problem and identify the cause.
 างครั้งปัญหาการเชื่อมต่ออินเทอร์เน็ตอาจกลายเป็นเรื่องความคับข้องใจเราได้เหมือนกัน  การกดแป้น F5 และการโหลดเว็บไซต์ใหม่ ก็อาจจะไม่เพียงพอ  แต่ถ้าเราพอจะมีประสบการณ์ในการแก้ปัญหาอยู่บ้าง ปัญหานี้ก็อาจจะคลี่คลายลงได้

Ensure we check the physical connections before getting too involved with troubleshooting. Anyone could have accidentally kicked the router or modem’s power cable or pulled an Ethernet cable out of a socket, causing the problem.
ก่อนอื่น เราต้องแน่ใจก่อนนะว่า กายภาพของการเชื่อมต่อ (the physical connections) ได้แก่ อุปกรณ์ สายสัญญาณ จุดเชื่อมต่อต่างๆ จักต้องอยู่ในสภาพปกติ ไม่มีใครไปสะดุดสายจนหลุด หรือดึงสายต่างๆ ออก

#    #     #  

Ping


Ping  (wikipedia.org) is a computer network administration utility used to test the reach-ability of a host on an Internet Protocol (IP) network and to measure the round-trip time for messages sent from the originating host to a destination computer.
ping เป็นคำสั่งที่ใช้บริหารจัดการ (administration utility) ระบบเครือข่ายคอมพิวเตอร์ ใช้เพื่อตรวจสอบการเข้าถึงเครื่องคอมพิวเตอร์ที่มีตัวตนจริงหรือโฮสต์ (host) ของเครือข่ายที่ใช้อินเทอร์เน็ตโปรโตคอล  เพื่อจะวัดเวลาของการสื่อสารไป-กลับ ระหว่างคอมพิวเตอร์ต้นทางและปลายทาง

The name comes from active sonar terminology which sends a pulse of sound and listens for the echo to detect objects underwater. 
ชื่อนี้มีที่มาจากโซนาร์ sonar terminology ที่เรือดำน้ำใช้ส่งให้ไปกระทบวัตถุใต้น้ำ แล้วสะท้อนกลับมานั่นเอง

One of the first things to try when our connection doesn’t seem to be working properly is the ping command. Open a Command Prompt window from your "Start button" using the "cmd" command  and type a command like ping google.com.  
 สิ่งแรกที่เราควรทำ เมื่อการเชื่อมต่ออินเทอร์เน็ตของเราไม่เวิร์ก ก็คือ การใช้คำสั่ง ping โดยอาจจะเปิดหน้าต่าง command prompt ด้วยคำสั่ง cmd ณ Start Button แล้วพิมพ์คำสั่ง เช่น ping google.com .  


This command sends several packets to the address you specify. 
We can see that everything is working fine.
There’s 0% packet loss and the time each packet takes is fairly low.  

คำสั่ง ping จะส่ง packets (ข้อมูลในหน่วยวินาที) ไปยังเครื่องที่เป็นโฮสต์ปลายทาง 
จากภาพ จะเห็นว่า คำสั่งทำงานได้ดี  ไม่มีการสูญเสีย packet เลย  คือ ส่งไป 4 ได้คืน 4
และใช้เวลาน้อย 13-25 (เฉลี่ย 18) มิลลิวินาที 


  #    #     #

Modem & Router Issues

 Sometimes our modems or routers can cause the problem of Internet connection. A modem is a device that communicates with your Internet service provider (ISP), e.g. TOT, while the router shares the connection among all the computers and other networked devices in our home network. In my case (and also other students' cases ) , the modem and the router of mine is the same device, so it is called the "modem-router".
 างครั้ง Modem หรือ Router ก็อาจจะเป็นปัญหาการเชื่อมต่ออินเทอร์เน็ตของเราก็ได้  
Modem เป็นเครื่องมือในการสื่อสารกับผู้ให้บริการอินเทอร์เน็ต (Internet service provider : ISP)  อาทิ  TOT   สำหรับ Router เป็นอุปกรณ์ที่ทำหน้าที่แชร์การเชื่อมต่อระหว่างคอมพิวเตอร์และอุปกรณ์ต่างๆ ในระบบโฮมเน็ตเวิร์ก  กรณีของบ้านครูเอง (และบ้านนักเรียนกาญจนาฯ หลายคน) อุปกรณ์สองอย่างนี้จะเป็นตัวเดียวกัน มันเลยถูกเรียกว่า "modem-router"

 Let's take a look at the modem-router. If green lights are flashing on it, that’s normal and indicates network traffic. If we see a steady, blinking orange light, that generally indicates the problem. 

องดูสิว่า  modem-router ของบ้านเรา  มันมีไฟสัญญาณเป็นสีเขียวนิ่งๆ หรือเปล่า? ถ้าใช่ ก็แสดงว่า เครือข่ายโฮมเน็ตเวิร์กบ้านเราทำงานเป็นปกติดีไม่มีปัญหา  แต่ถ้าเราเห็นไฟสัญญาณเป็นสีอำพันกระพริบๆ ก็หมายความว่า โฮมเน็ตเวิร์กมีปัญหาแล้ว

 
All Green Lights Mean Normality
สัญญาณไฟเขียวตลอดแบบนี้ แสดงว่า ทุกอย่างปกติดี


If the lights indicate that either devices are experiencing a problem, try unplugging them and plugging them back in. This is just like restarting our computer. If we still experience problems, we may need to perform a factory reset on your router (to see its manual)
 ากไฟสัญญาณของ modem-router แสดงว่า มีปัญหา  ขอให้เราลองดึงปลั๊กไฟของมันออก แล้วเสียบกลับเข้าไปใหม่  ทำแบบนี้ก็ทำนองเดียวกับการที่เรา Restart คอมพิวเตอร์ใหม่นั่นแหละ  หากทำแล้วยังมีปัญหาอยู่  เราก็อาจจะต้องทำการรีเซ็ตอุปกรณ์นี้ใหม่ (ดูคู่มือก่อน) ให้กลับไปเป็นค่าที่ตั้งมาจากโรงงาน


#    #     #

Our Classroom102

What is about the problem when we are in the classroom? Because the IPaddress conflict can be occurred  anytime, so any computer in the classroom102 can be kicked off easily by the gateway computer of the Media Center which we have to lean on.
ปัญหาการเชื่อมต่ออินเทอร์เน็ตในห้องเรียนเป็นแบบไหน? ก็เพราะปัญหารหัสไอพีของเครื่องขัดแย้งกัน (IPaddress conflict) สามารถเกิดขึ้นได้ตลอดเวลา  ดังนั้นคอมพิวเตอร์ในห้องเรียน102 ก็มีสิทธิ์จะถูกดีดออกนอกระบบได้ไม่ยากจากเครื่องเกตเวย์ของศูนย์สื่อที่เราต้องพึ่งพาในการเชื่อมต่ออินเทอร์เน็ตนั่นเอง
  
Yes, we cannot connect to the Net directly but always request Internet sharing with the server computer of School Media Center through the local area network.
ใช่เลย  เราไม่ และไม่อาจเชื่อมต่ออินเทอร์เน็ตโดยตรงได้ นอกจากต้องพึ่งพาเครื่องคอมพิวเตอร์แม่ข่ายของศูนย์สื่อของโรงเรียน  (the server computer of School Media Center)  ผ่านระบบเครือข่ายแลน


There are variety kinds of computer in the classroom102, both old and new, big-name and no-name, useable and unusable 
คอมพิวเตอร์ในห้องเรียน 102 มีหลายจำพวก ทั้งเก่าทั้งใหม่  ทั้งมียี่ห้อและไม่มียี่ห้อ  ที่ใช้ได้ก็มี ที่ใช้ไม่ได้ก็มี


Because any student can log on any computer in our classroom with the administrative account, so he has the full permissions to change/config anything about the network, then any problem can be occurred anytime.
เป็นเพราะนักเรียนสามารถจะล็อกออนเข้าใช้งานคอมพิวเตอร์ด้วยแอ็คเคาท์ของผู้ดูและระบบของเครื่องคอมพิวเตอร์นั้นๆ (the administrative account)  ก็เลยมีสิทธิ์เต็มร้อยที่จะเข้าไปปรับค่าต่างๆ ของระบบเครือข่ายของเครื่อง  ปัญหาก็อาจจะเกิดขึ้นได้ตลอดเวลา

ขอขอบคุณ http://occupatech.blogspot.com

Programming (การโปรแกรม) with Visual Basic 6.0


                                                                       by Teacher  Phaitoon  Yaemprasuan
                                                                                           picta55@gmail.com
                                                                                           occupatech@gmail.com
                                                                                           http://picta55.blogspot.com

What is Visual Basic?
วิชวลเบสิกคืออะไร


Visual Basic is a tool that allows us to develop Windows (Graphic User Interface - GUI) applications.  The applications have a familiar appearance to the user.
วิชวลเบสิก เป็นเครื่องมือของเราในการสร้างแอ็ปปลิเคชัน (โปรแกรมประยุกต์) ที่ทำงานภายใต้ระบบปฏิบัติการ Windows ซึ่งแอ็ปปลิเคชันที่ได้จะมีรูปแบบการติดต่อกับผู้ใช้เป็นกราฟิก (GUI : Graphic User Interface)
 
 Visual Basic is event-driven, meaning code remains idle until it is called upon to respond to some event (e.g. mouse clicking, button pressing, menu selection, ...).  Nothing happens until an event is detected.  Once an event is detected, the code corresponding to that event (event procedure) is executed.  
 
วิชวลเบสิก จะใช้ Event (เหตุการณ์) เป็นตัวขับเคลื่อนคำสั่ง (event-driven)  หมายความว่า โค้ดของโปรแกรม จะยังไม่ทำอะไร (idle) จนกว่ามันจะถูกเรียกให้ตอบสนองต่อ event  (เช่น การคลิกเมาส์  การกดปุ่ม  การเลือกเมนู  ฯลฯ)  นั่นคือ จะไม่มีอะไรเกิดขึ้นจนกว่า event จะถูกตรวจพบ  เมื่อนั้นแหละ code ของโปรแกรมก็จะตอบสนองต่อ event นั้นๆ  ในลักษณะของโปรแกรมย่อยๆ หรือโมดุล (event procedure)
 

 How to program with Visual Basic?
จะโปรแกรมด้วยวิชวลเบสิกอย่างไร


Steps in Developing Application 
ขั้นตอนการพัฒนาแอ็ปปลิเคชัน

There are three primary steps involved in building a Visual Basic application:
มีขั้นตอนหลักๆ 3 ขั้นตอน ที่เกี่ยวข้องกับการสร้างแอ็ปปลิเคชันด้วยวิชวลเบสิก
1.    Draw the user interface  ออกแบบส่วนติดต่อกับผู้ใช้
2.    Assign properties to controls  กำหนดคุณสมบัติให้กับคอนโทรล
3.    Attach code to controls  ผูกติด code เข้ากับคอนโทรล


Stop Watch Application
โปรแกรมจับเวลา

            SOURCE  :   www.kidwares.com

1 At the "Start-up Menu" of our Windows Desktop, let's find where "Microsoft Visual Studio 6.0" is, and click on it. Then we can see some shortcuts to the applications of the software suite, and "Microsoft Visual Basic6.0" is one of them and it is also our "target software" right now, let's select it.
ณ  สตาร์ทอัพเมนู ที่หน้าเดสต์ท็อปของระบบวินโดวส์  นักเรียนลองหาเมนู Microsoft Visual Studio 6.0  และคลิกเมาส์เลือก เราจะเห็นช็อตคัตของแอปปลิเคชันต่างๆ ที่รวมกันอยู่ในซอฟต์แวร์ชุดนี้ รวมถึง Microsoft Visual Basic6.0 ซึ่งเป็นซอฟต์แวร์เป้าหมายที่เราจะใช้ในงานนี้แหละ  เราก็เลือกซะนะ

At the "Start-up Menu of Windows", Find where the "Microsoft Visual Basic 6.0" is.
ณ สตาร์ทอัพเมนูของระบบวินโวส์  ให้หาว่า Microsoft Visual Basic 6.0 อยู่ไหน


2 We now at the main screen of Visual Basic 6.0 with its "New Project" window. Let's click on the "New" tab and select "Standard EXE" icon.
 ตอนนี้เราก็มาอยู่ ณ หน้าจอหลักของ Visual Basic 6.0 ซึ่งมีหน้าต่าง New Project โชว์อยู่  ให้เราเลือกแท็บ New และสัญรูป Standard EXE 
Select the "Standard EXE" icon  ให้นักเรียนเลือกสัญรูป Standard EXE

3 Before we go on, let's consider the components of the toolbar of Visual Basic 6.0.  Properties window, Run and Save project are what we have to focus on now.
ก่อนอื่น ขอให้เราลองพิจารณาแถบเครื่องมือของ Visual Basic 6.0 กันก่อน  Properties window, Run, Save project เป็นอะไรที่เราจะต้องโฟกัสออนกันก่อนตอนนี้ 

Design View of Visual Basic 6.0   มุมมองในโหมดออกแบบของวิชวลเบสิก

4 Controls are the genius tools that can be attached by any codes that can control any events such as clicking mouse or pressing key. Now the "Command Button" and the "Label" are the controls that we are going to use.
คอนโทรล เป็นเครื่องมืออัจฉริยะ ที่สามารถจะนำเอาโค้ดคำสั่งมาผูกติด ทำให้สามารถควบคุมเหตุการณ์ได้ อาทิ  การคลิกเมาส์  หรือการกดแป้นพิมพ์  ตอนนี้คอนโทรลที่เรากำลังจะใช้งานก็คือ Command Button และ Label

Controls of Visual Basic 6.0   คอนโทรลต่างๆ ของวิชวลเบสิก 6.0

5 Visual Basic programming begins with a form which has been named "Form1" by default. Visual Basic form simulates itself as platform which can receive many kinds of objects that created by the controls. Any object has its properties that has been shown in the properties window.
การโปรแกรมด้วยภาษาวิชวลเบสิกนี้ จะเเริ่มจาก Form ซึ่งโปรแกรมจะกำหนดชื่อให้ก่อนเลยว่า Form1 (เราสามารถเปลี่ยนชื่อได้)  ฟอร์มของวิชวลเบสิกจะจำลองตัวมันเองเป็นเสมือนแพล็ตฟอร์ม ที่สามารถจะรองรับวัตถุหรืออ็อบเจ็กต์ที่สร้างจากคอนโทรล (ด้านซ้าย)  และวัตถุนั้นมันจะมีคุณสมบัติหรือพร็อพเพอร์ตีส์ของตัวมันเอง โดยจะแสดงให้เราเห็นในหน้าต่างพร็อพเพอร์ตีส์ (ด้านขวา) 

Form and Controls are variety kinds of object of Visual Basic that have their own properties. 
Form และ Controls เป็นอ็อบเจ็กต์(วัตถุ) ที่หลากหลายของ Visual Basic ที่มี properties ของตนเอง
6 Here we go on creating a design job like the following picture.  
    -  Using the "Command Button" control to draw the three sequence command buttons, Command1,Command2 and Command3. 
   -  Using the "Label" control to draw the six sequence labels, Label1, 
Label2, Label3, Label4, Label5 and Label6 
ให้นักเรียนลงมือสร้างงานออกแบบ ตามรูปด้านล่างนี้เลยนะ
   -  โดยการใช้คอนโทรล Command Button วาดปุ่มคำสั่งขึ้นมาสามปุ่มตามลำดับ
   -  โดยการใช้คอนโทรล Label  วาดอ็อบเจ็กต์ต่อเนื่องกัน รวม 6 เลเบิล

Form1 would have three command buttons and six labels now.
Form 1 ที่เราออกแบบนี้ก็จะมีปุ่มคำสั่ง (command button) 3 ปุ่ม  และมีฉลาก (label) รวม 6 ฉลาก  
7 Click on "Form1", we can see its properties, rename it with "frmStopWatch" (frm is a pefix which comes from "form"). And change its caption to "Stop Watch Application".
คลิกที่อ็อบเจ็กต์ Form1 เราจะเห็น properties ของมันอยู่ทางด้านขวา  ให้เราปรับเปลี่ยนชื่อ (name) ของมันใหม่เป็น "frmStopWatch" (frm เป็นคำนำหน้าชื่อ มาจาก form นั่นเอง)  และปรับเปลี่ยน Caption (คำอธิบายอ็อบเจ็กต์) ให้เป็น "Stop Watch Application"

Form1 Properties Configurations  การตั้งค่าคุณสมบัติของอ็อบเจ็กต์ Form1


8 Click on "Command1", yes we are about to specify the properties of this object. Rename it with "cmdStart" (cmd is a prefix which comes from "command button") and also refill its caption with "&Start Timing" (& is a prefix of the key letter that a user can press on this key together with the "alt" key instead of click on this command button). 
คลิกปุ่ม Command1 เพื่อเปลี่ยนคุณสมบัติ  โดยให้ชื่อใหม่ว่า cmdStart (cmd เป็นคำนำหน้า มาจาก Command Button)  และเปลี่ยน Caption ให้เป็น "&Start Timing" (& นำหน้าตัวอักษรสำคัญที่จะบอกผู้ใช้ให้รู้ว่า เขาสามารถกดคีย์นี้ร่วมกับคีย์"alt"ที่คีย์บอร์ด เพื่อใช้งาน command button แทนการคลิกเมาส์ได้). 


Change the properties of the command button :  name and caption
ให้นักเรียนเปลี่ยนชื่อ และแค็ปชันของปุ่มคำสั่ง

9 Do it the same way as the previous step. ทำเหมือนขั้นตอนที่แล้ว 
Change the properties of the command button :  name and caption


10 Do it the same way as the previous step.ทำเหมือนขั้นตอนที่แล้ว

Change the properties of the command button :  name and caption


11  Change only the captions of Label1, Label2 and Label3 according to the following picture. ให้เปลี่ยนเฉพาะ Caption ของทั้งสาม Labels เท่านั้น  ไม่ต้องเปลี่ยนชื่อ (เนื่องจากเป็นแค่ป้ายกำกับเท่านั้น ไม่ได้เกี่ยวข้องกับการกำหนดโค้ดโปรแกรม)

Change the properties of the three labels :   captions  เปลี่ยนแค่แค็ปชันของสามเลเบิลแรก

12  Change the properties of the other last three labels, "Label4", "Label5" and "Label6" by renaming them to "lblStart", "lblEnd" and "lblElapsed" and erase their captions until they are blank.
เปลี่ยน properties ของ Label4, Label5, Label6 โดยเปลี่ยนชื่อเป็น lblStart, lblEnd, lblElapsed  และลบ captions ของทั้งสามเลเบิลออกจนว่างเปล่าทั้งหมด

Change the properties of Label4, Label5 and Label6 according to the picture. 
เปลี่ยนชื่อของสามเลเบิลท้าย  และเคลียร์แค็ปชันให้ว่าง (blank)
13  Now we have just already designed and configured all of related objects, the next step of us is coding our program. Let's click on the menu-bar at the "View" command tab, then select the "Code" sub-command, the view-code window will show up. Yes, we are going to enter our source codes of our application here. 
มาถึงตอนนี้ เราก็ได้ทำการออกแบบ และกำหนดคุณสมบัติต่างๆ ให้กับอ็อบเจ็กต์ต่างๆ ที่เกี่ยวข้องไปเรียบร้อยแล้ว  ขั้นตอนต่อไปของเราก็คือ การใส่โค้ดให้กับโปรแกรมของเรา  ให้นักเรียนคลิกไปที่แท็บคำสั่ง View ของแถบเมนู  จากนั้นให้เลือกคำสั่งย่อย Code  หน้าต่างโค้ดก็จะปรากฏขึ้น  ใช่เลย เราจะป้อนซอร์สโค้ดโปรแกรมของเราตรงนี้แหละ

Click on the "View" command at the menu bar, then select "Code" subcommand

14  The first set of source codes is about the declarations. There will be the "(General)" at the left-top of the view-code window and the "(Declarations)" at the right-top. We have to type four lines of our following source codes.
ซอร์สโค้ดกลุ่มแรก เป็นโค้ดที่เกี่ยวข้องกับการประกาศตัวแปร  นักเรียนจะเห็นว่ามี (General) อยู่ที่หัวข้อด้านซ้าย  และ(Declarations) อยู่ที่หัวข้อด้านขวา

        1st Line is about the General Declaration  เป็นคำประกาศทั่วไป
        2nd Line is the Declaration of variable "StartTime"  ประกาศตัวแปรเพื่อรับค่าเวลาเริ่มต้น
        3rd Line is 
the Declaration of variable "EndTime" ประกาศตัวแปรเพื่อรับค่าเวลาที่หยุด
        4th Line is the Declaration of variable "ElapsedTime"
 ประกาศตัวแปรเพื่อรับค่าเวลาที่ใช้ไป
15  This step is about attaching our source code to a control object. The "cmdStart" is a command button we are going to attach the source code. Let's double click on this command button, yes, this action could bring us to a module or subprogram that could be driven by an event, _click ( ), that means this subprogram could work when this command button was clicked on. 
ขั้นตอนนี้ จะเป็นการผูกซอร์สโค้ดโปรแกรมของเราไว้กับปุ่มคำสั่ง cmdStart  ให้นักเรียนดับเบิลคลิกที่ปุ่มคำสั่งนี้ (เมื่อเราอยู่ในมุมมอง Object)  จากนั้นจะพาเราเข้าสู่ห้วงของโมดุลหรือโปรแกรมย่อย  ซึ่งโปรแกรมย่อยหรือโมดลที่ว่านี้ จะถูกขับเคลื่อนโดยเหตุการณ์ (event-driven)  ซึ่ง ณ ที่นี้ก็คือ " _click ( )" การคลิกเมาส์ของผู้ใช้โปรแกรมนั่นเอง 
 What is about this source code?  It begins with assigning the recent time value (Now) to the variable "StartTime".  Then the method "Caption" stipulates that the label "lblStart" can show up data from the variable "startTime" with the "hh:mm:ss:" format.
ซอร์สโค้ดนี้มันคืออะไรหรือ?  โค้ดจะเริ่มจากการกำหนดให้ตัวแปร StartTime เอาค่า Now คือเวลาปัจจุบันไปเก็บไว้  ต่อจากนั้นโค้ดก็จะมีวิธีการ (Method) ที่ชื่อว่า Caption  เป็นตัวกำหนดรูปแบบการแสดงค่าของเวลา โดยเอาค่าที่เก็บไว้ในตัวแปร StartTime นั้นมาแสดงผลเวลาในเลเบิล lblStart
  
Attach code to the command button "cmdStart"
ผูกโค้ดเข้ากับปุ่มคำสั่ง "cmdStart"

16  This step is similar to the previous but it turns to the "cmdEnd" command button. But it creates the expression which assigns the variable "ElapsedTime" with the difference of the variable "EndTine" and the variable "StartTine".
ในขั้นตอนนี้ ก็คล้ายกับขั้นตอนที่ผ่านมา  แต่จะมีการสร้างนิพจน์คำนวณค่าส่วนต่างของเวลา ระหว่่างตัวแปร EndTime และตัวแปร StartTime และนำไปเก็บไว้ในตัวแปร ElapsedTime
  
Attach code to the command button "cmdEnd"
ผูกโค้ดเข้ากับปุ่มคำสั่ง "cmdEnd"

17  This is the end of application with the only amazing word "End"
Attach code to the command button "cmdExit"
ผูกโค้ดเข้ากับปุ่มคำสั่ง "cmdExit"


18  Congratulation to our tough project!. This is the output of our input and process. Yes, it is the "Stop Watch Application" of us.  
ขอแสดงความยินดีกับโครงงานสุดหินนะนักเรียน  นี่คือผลที่ได้ จากการสร้างและป้อน  ประมวลผล  จนได้แอ็ปปลิเคชันนาฬิกาจับเวลา หน้าตาแบบนี้แหละน้า 

Our Graphic User Interface Application :  "Stop Watch"
แอ็ปปลิเคชันของเราที่มีรูปแบบการติดต่อกับผู้ใช้เป็นกราฟิก (GUI)
19  We have to make our project to an independent application.  Click on the "File" command at the menubar then select the "Make..to..EXE" subcommand.   
เราต้องทำให้โปรเจ็กต์ (โครงงาน) ของเราที่รันได้แล้วนี้ ให้กลายเป็นแอ็ปปลิเคชันอิสระที่สามารถรันได้เอง (โดยที่ไม่ต้องอาศัย Visual Basic)  ทำได้โดยการคลิกคำสั่ง File  ณ แถบเมนูคำสั่ง  แล้วเลือกคำสั่งย่อย Make..to..EXE  เท่านี้ก็เสร็จเรียบร้อย

ขอขอบคุณ http://occupatech.blogspot.com

Interesting «Google Earth»


             SOURCE  :  http://bigpicture.ru/?p=293225

In this collection you will find interesting satellite images obtained by means of service «Google Earth."

ภาพต่อไปนี้ เป็นภาพถ่ายดาวเทียมที่น่าสนใจ จาก Google Earth 


1806 Interesting «Google Earth»
1. The military theme park «Binhai Aircraft Park» in Tianjin, China. (© Google, GeoEye, TerraMetrics)
สวนสาธารณะอากาศยานบินไห่  เมืองเทียนสิน  ประเทศจีน
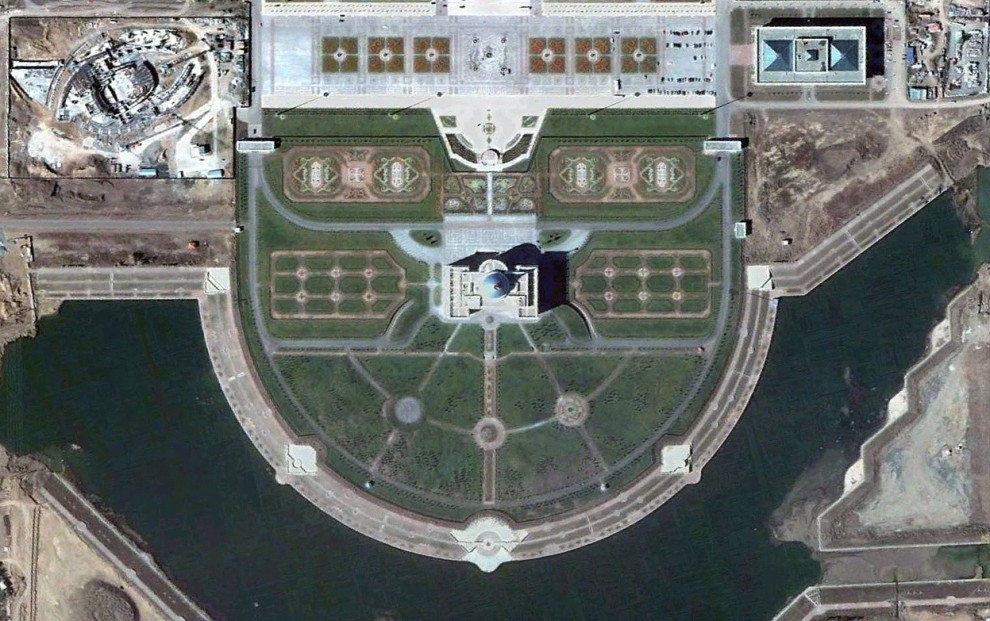
2371 Interesting «Google Earth»
2. Ak Orda - the residence of the President of the Republic of Kazakhstan in Astana, capital of Kazakhstan. (© Google, GeoEye, DigitalGlobe)
ทำเนียบประธานาธิบดี สาธารณรัฐคาซัคสถาน (ประเทศเกิดใหม่ ที่แยกตัวมาจากสหภาพโซเวียต  อยู่แถวๆ เอเชียกลาง)

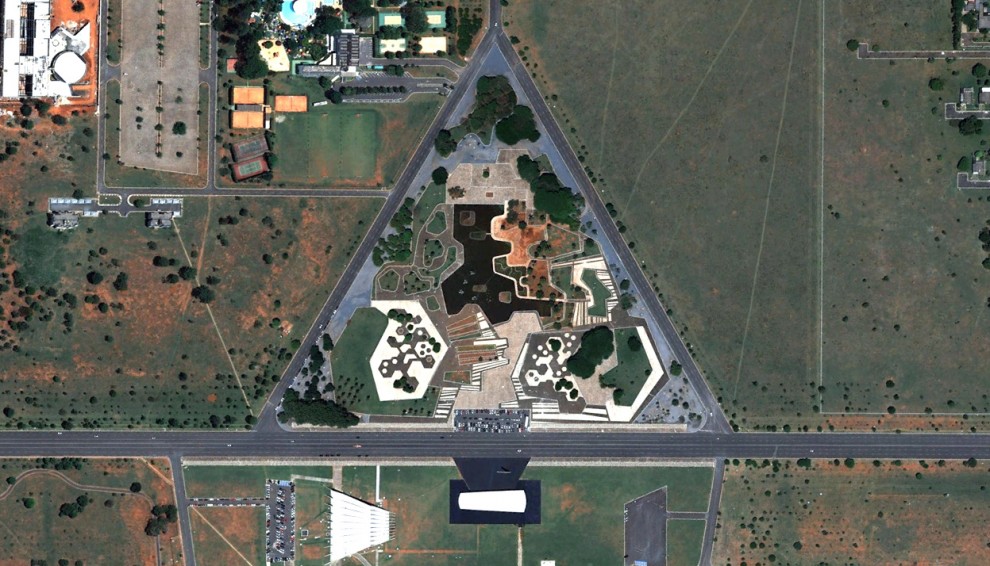
3254 Interesting «Google Earth»
3. Park «Praça dos Cristais» in Brasilia, Brazil. (© Google, Tele Atlas, MapLink)
สวนสาธารณะ เมืองหลวงของสาธารณรัฐบราซิล

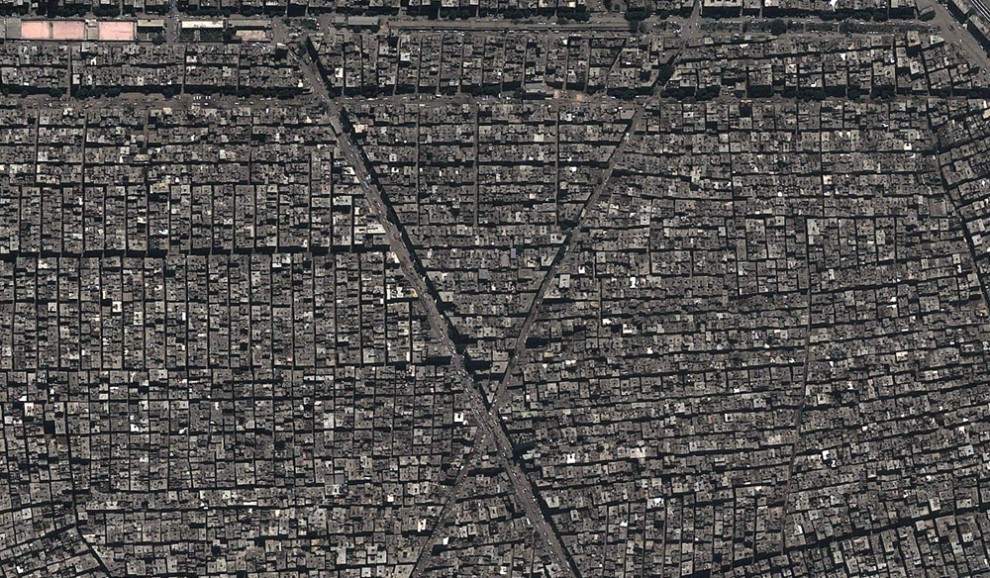
4207 Interesting «Google Earth»
4. Densely populated area of ​​Imbaba in the historic Cairo, Egypt. (© Google, GeoEye)
ย่านเก่าแก่ของกรุงไคโร ประเทศอิยิปต์

5190 Interesting «Google Earth»
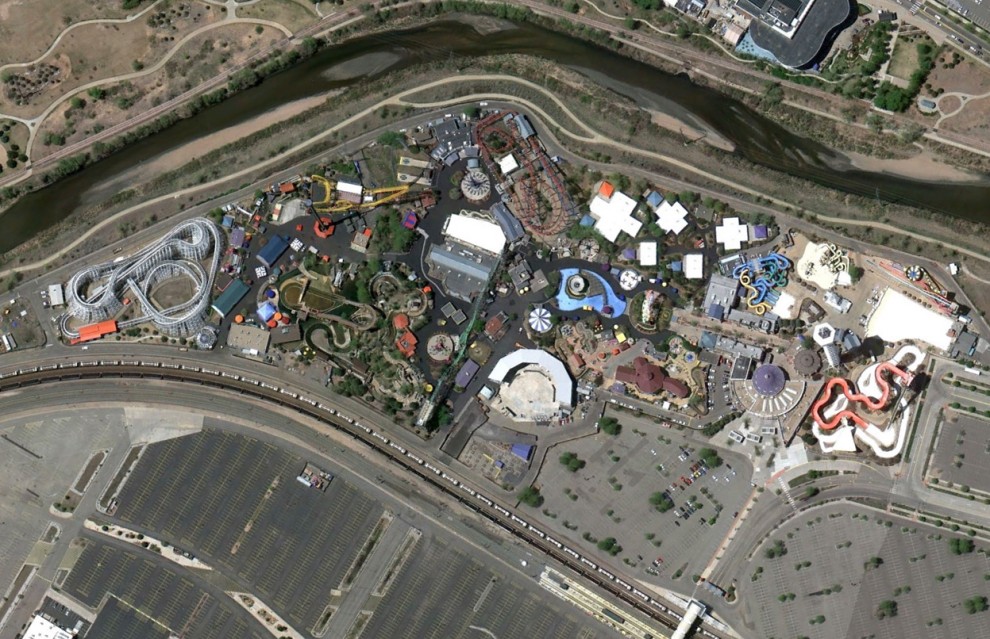
5. Theme Park «Elitch Gardens», Denver, Colorado. (© Google)
เมืองเดนเวอร์  มลรัฐคาโลราโด  สหรัฐอเมริกา
6184 Interesting «Google Earth»
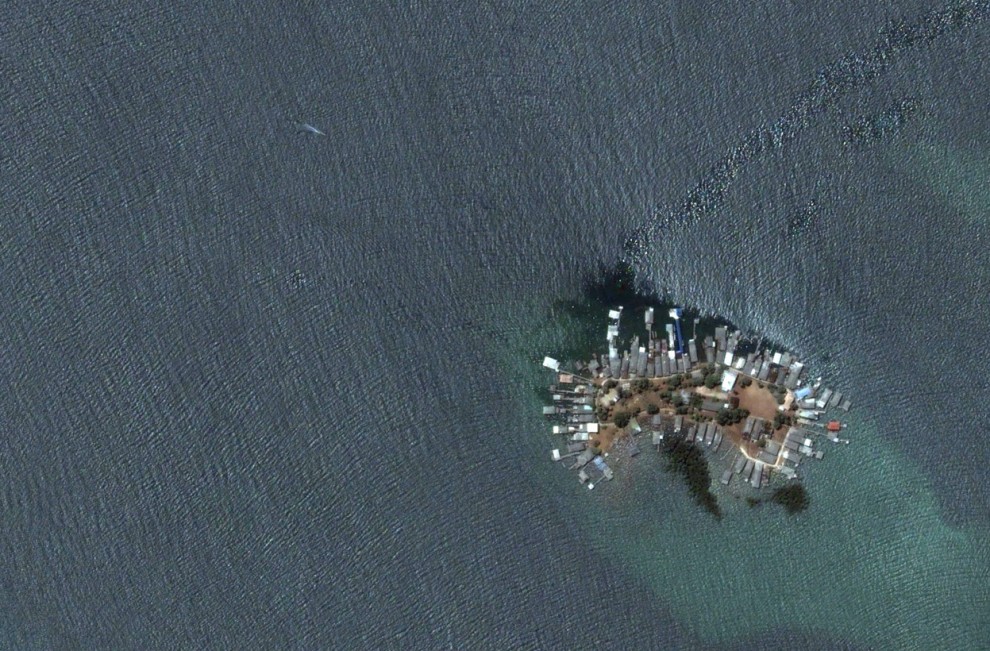
6. Riau Archipelago, Indonesia. (© Google, DigitalGlobe)
ประเทศอินโดนีเซีย

7169 Interesting «Google Earth»
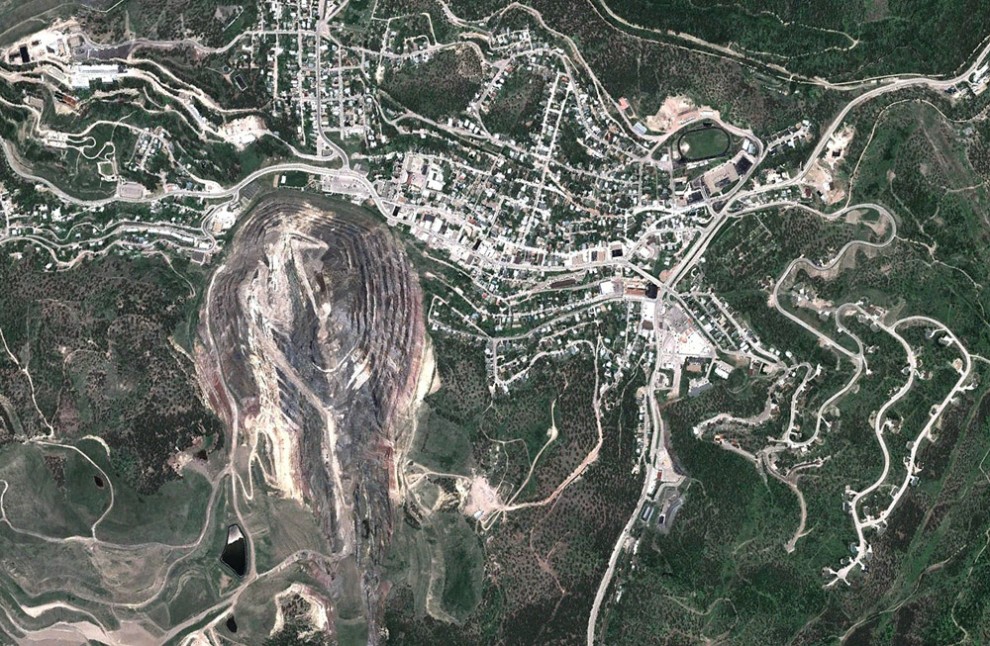
7. Gold-mine «Homestake Mine», Leeds, South Dakota. (© Google, GeoEye)
เหมืองทองคำ  มลรัฐเซาธ์ดาโกตา  สหรัฐอเมริกา

8160 Interesting «Google Earth»
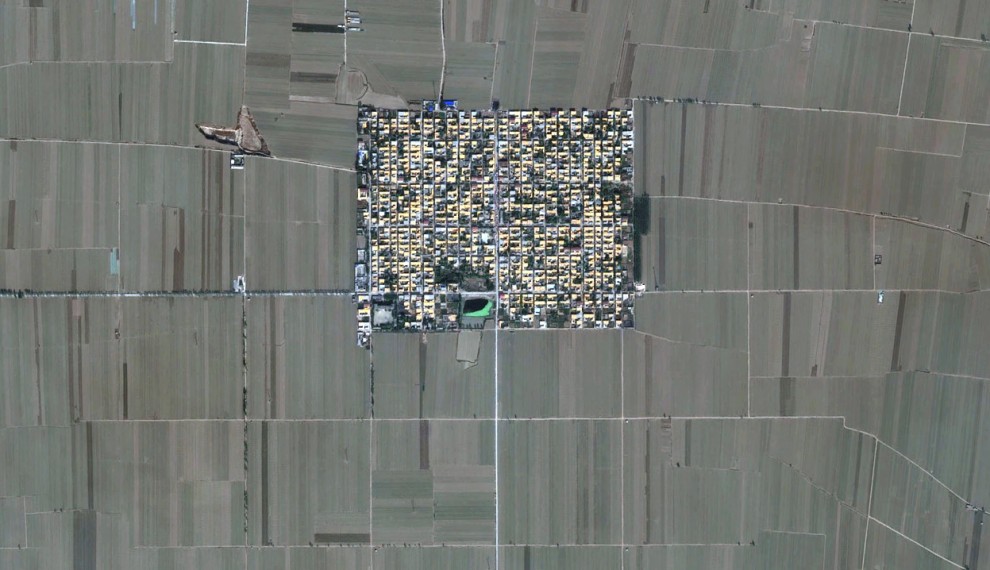
8. Town surrounded by farmland, in Gaocheng, Hebei Province, China. (© Google, GeoEye)
เมืองเกาเชิง  มลฑลเหอเป่ย  สาธารณรัฐประชาชนจีน

9154 Interesting «Google Earth»
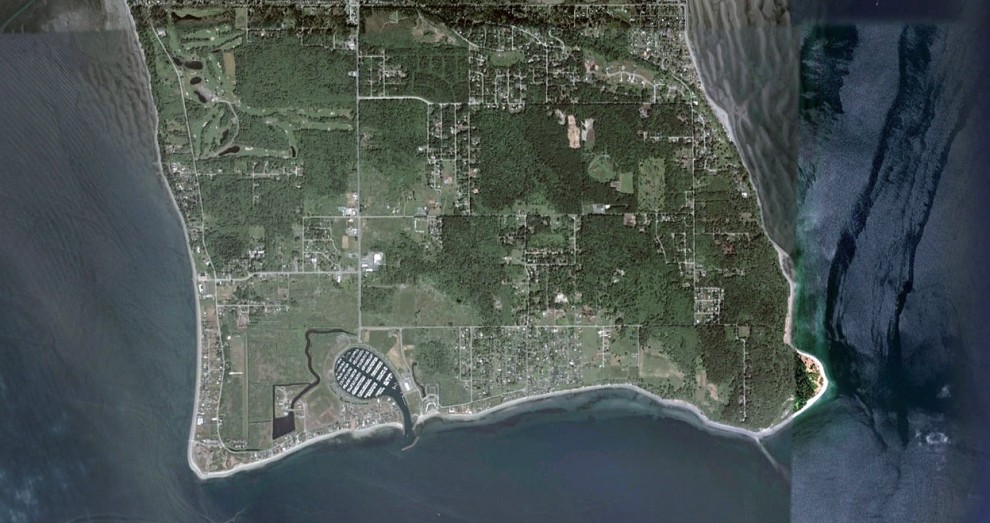
9. Point Roberts, Tsawwassen, British Columbia. (© Google, DigitalGlobe)
มณฑลบริติชโคลัมเบีย (ชายฝั่งมหาสมุทรแปซิฟิก)  ประเทศแคนาดา

10157 Interesting «Google Earth»
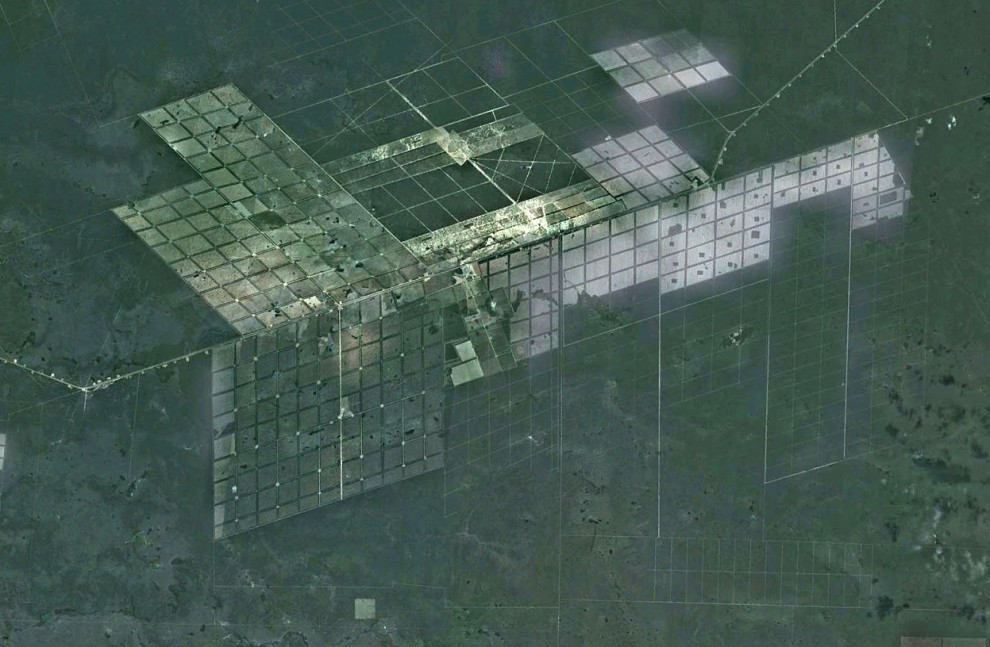
10. The fields in the department of Boqueron in western Paraguay. (© Google, GeoEye)
ทุ่งนา ในแถบตะวันตกของประเทศปารากวัย ทวีปอเมริกาใต้

11190 Interesting «Google Earth»
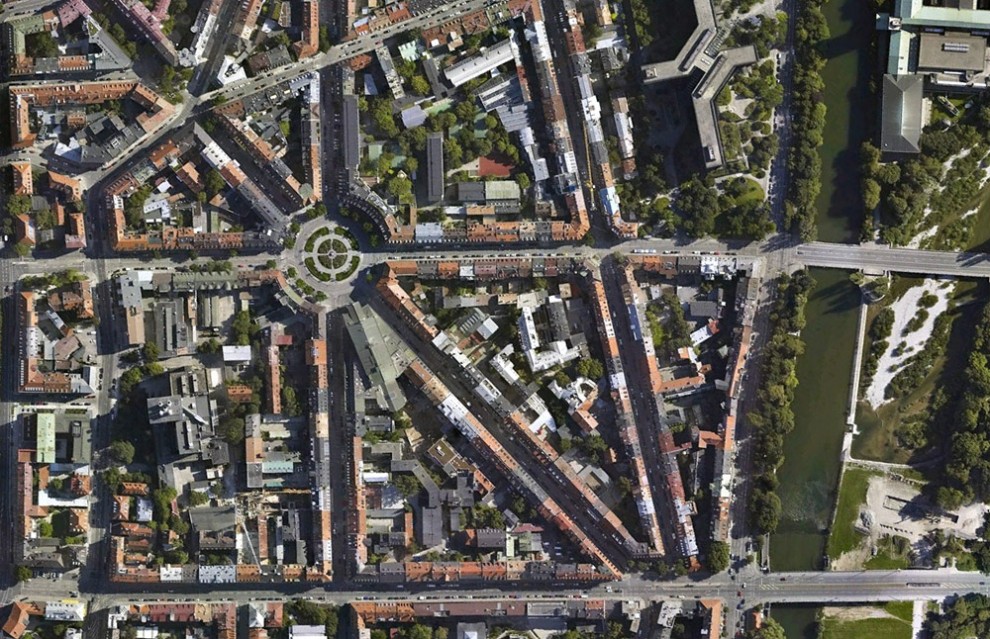
11. Gärtnerplatz area in the center of Munich, Germany. (© Google, COWI A / S)
นครมิวนิค สหพันธรัฐเยอรมนี

12163 Interesting «Google Earth»
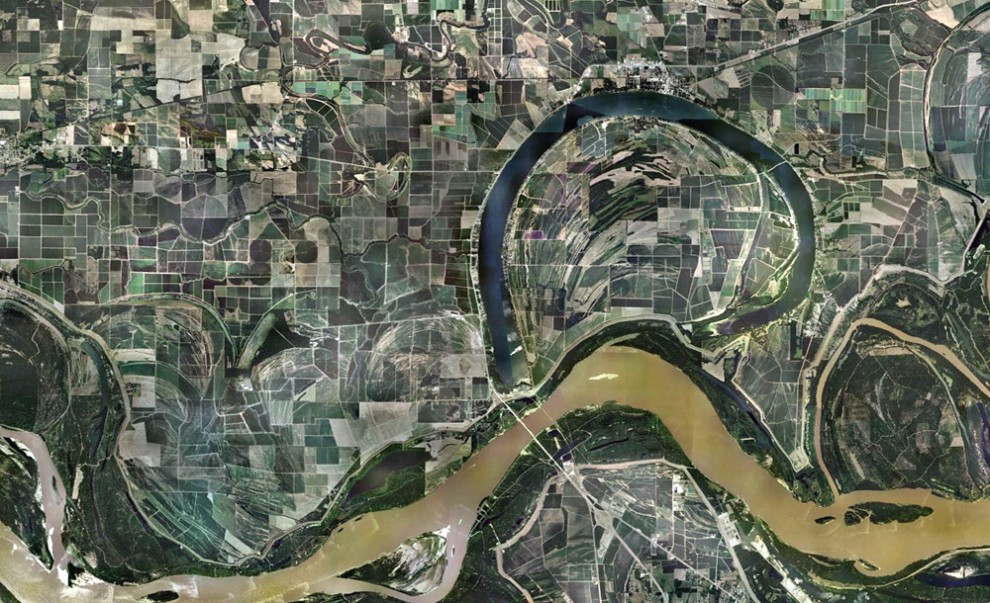
12. The quaint relief and farm along the banks of the Mississippi River near Lake Village, Arkansas, USA. (© Google)
แม่น้ำมิสซิสซิปปี  มลรัฐอาร์คันซอส์  สหรัฐอเมริกา

13139 Interesting «Google Earth»
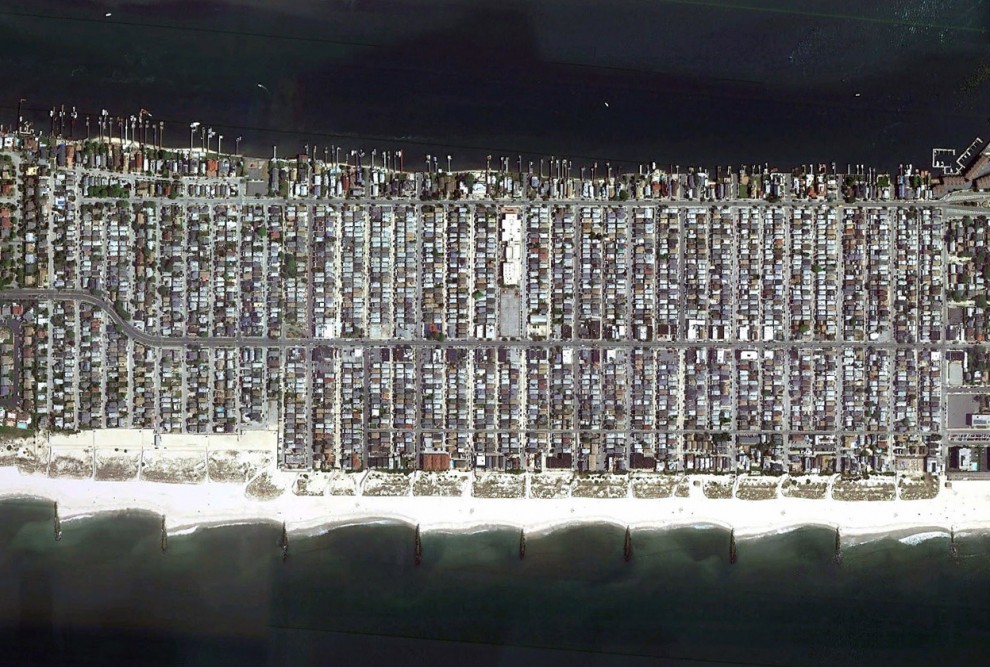
13. Long Beach, New York. (© Google)
ชายหาดเมืองลองบีช  มลรัฐนิวยอร์ก สหรัฐอเมริกา

14127 Interesting «Google Earth»
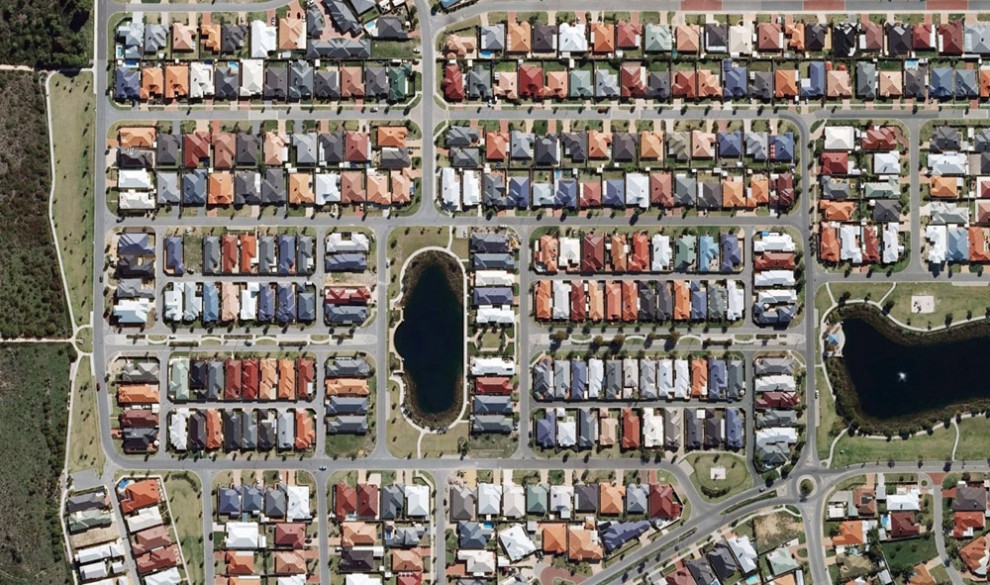
14. Multi-colored roof in the coastal area in Rockingham, Australia. (© Google, Whereis Sensis)
ประเทศออสเตรเลีย

15118 Interesting «Google Earth»
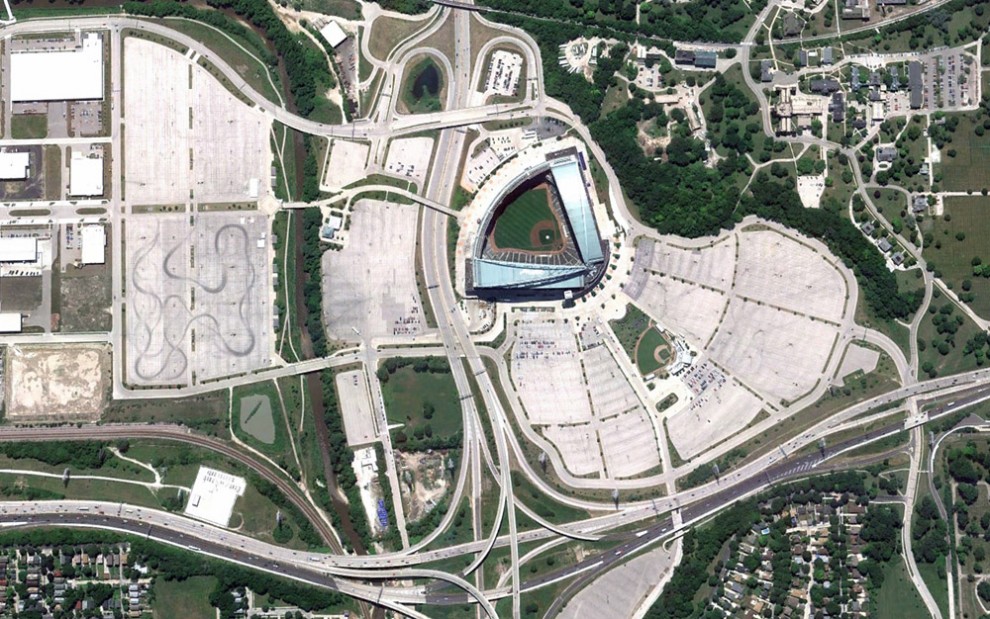
15. Stadium «Miller Park» in Milwaukee, Wisconsin. (© Google)
สนามเบสบอล  เมืองมิวอกกี้  มลรัฐวิสคอนซิน  สหรัฐอเมริกา

16107 Interesting «Google Earth»
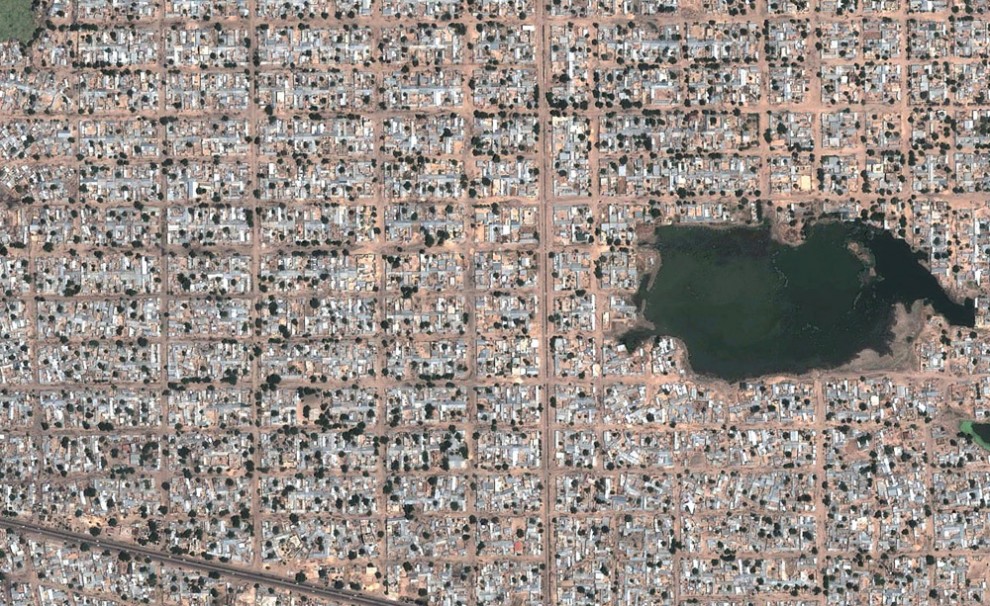
16. District Ndjamena, capital of Chad. (© Google, GeoEye)
เมืองหลวงของประเทศชาด  (บริเวณทะเลทรายซาฮาร่า  ทวีปแอฟริกาตอนเหนือ)

17101 Interesting «Google Earth»
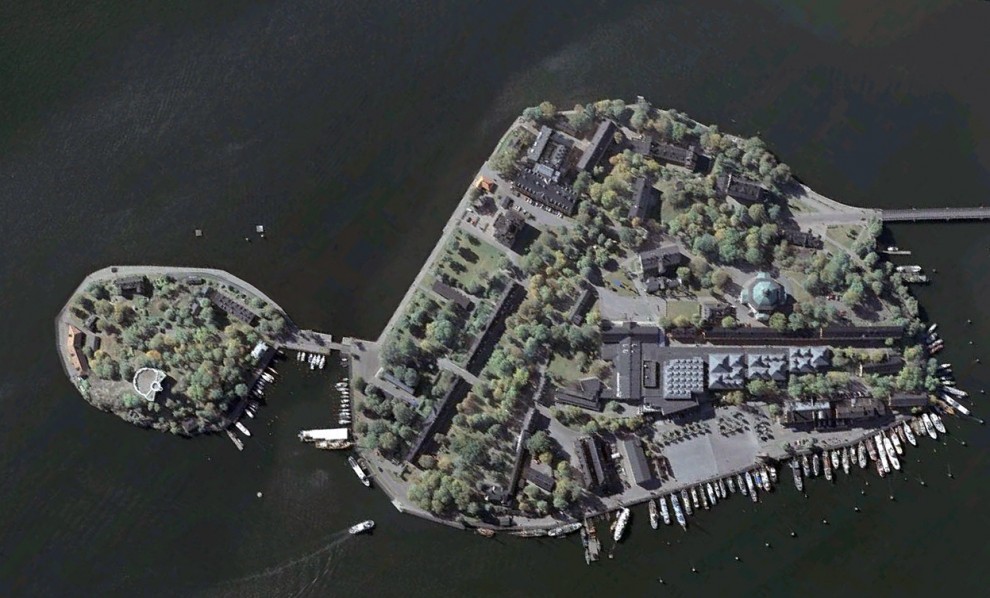
17. Skeppsholmen, Stockholm, Sweden. (© Google)
บริเวณกรุงสตอล์กโฮล์ม  ประเทศสวีเดน

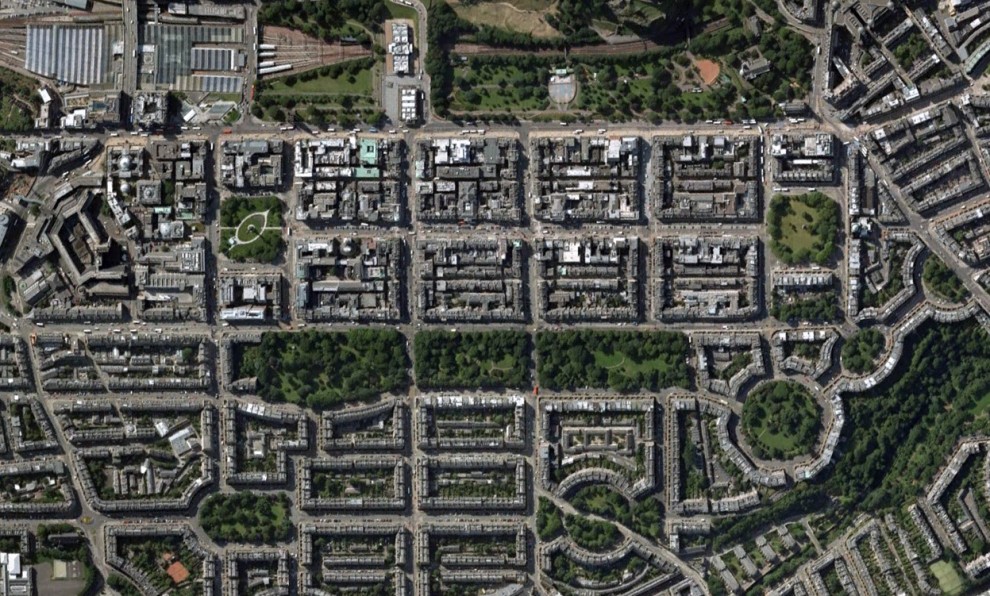
1884 Interesting «Google Earth»
18. Edinburgh, Scotland. (© Google, Infoterra Ltd. And Bluesky)
เมืองเอดินเบิร์ก   สก็อตแลนด์

ขอขอบคุณ  http://occupatech.blogspot.com